


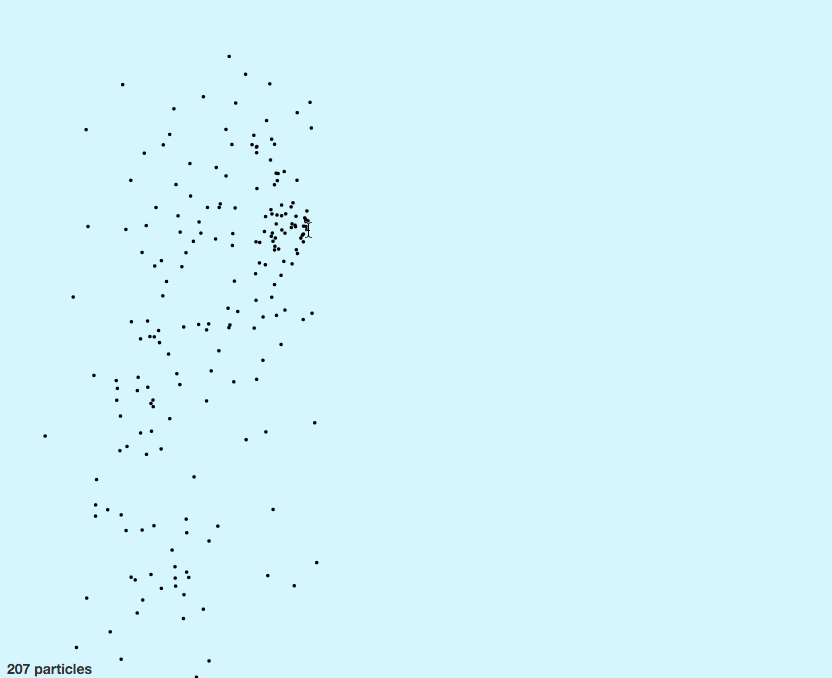
That’s a particle generator. It makes tiny circles fly out of where you click. Hold down your mouse and move around. The particles keep flying out of your cursor.
On mobile and only have a finger? That works, too.
I’m a nerd, so this is what I consider fun. Your mileage may vary. Please do click in the embed and look at those circles fly. Ain’t it cool?
Here’s how it works
The whole thing is built with React, Redux, and d3. No tricks for animation; just a bit of cleverness.
Here’s the general approach:
We use React to render everything: the page, the SVG element, the particles inside. All of it is built with React components that take some props and return some DOM. This lets us tap into React’s algorithms that decide which nodes to update and when to garbage collect old nodes.
Then we use some d3 calculations and event detection. D3 has great random generators, so we take advantage of that. D3’s mouse and touch event handlers calculate coordinates relative to our SVG. We need those, and React can’t do it. React’s click handlers are based on DOM nodes, which don’t correspond to (x, y) coordinates. D3 looks at real cursor position on screen.
All particle coordinates are in a Redux store. Each particle also has a movement vector. The store holds some useful flags and general parameters, too. This lets us treat animation as data transformations. I’ll show you what I mean in a bit.
We use actions to communicate user events like creating particles, starting the animation, changing mouse position, and so on. On each requestAnimationFrame, we dispatch an “advance animation” action.
On each action, the reducer calculates a new state for the whole app. This includes new particle positions for each step of the animation.
When the store updates, React flushes changes via props and because coordinates are state, the particles move.
The result is smooth animation.
Keep reading to learn the details. The code is also on GitHub.
A version of this article will be featured as a chapter in my upcoming React+d3js ES6 book.
3 presentation components
We’ll start with the presentation components because they’re the least complicated. To render a collection of particles, we need:
- a stateless
Particle - a stateless
Particles - a proper
App
None of them contain state, but App has to be a proper component so that we can use componentDidMount. We need it to attach d3 event listeners.
The Particle component is a circle. It looks like this:
// src/components/Particles/Particle.jsx
import React, { PropTypes } from 'react';

const Particle = ({ x, y }) => (
    <circle cx={x} cy={y} r="1.8">
);

Particle.propTypes = {
    x: PropTypes.number.isRequired,
    y: PropTypes.number.isRequired
};

export default Particle;
</circle>
It takes x and y coordinates and returns an SVG circle.
The Particles component isn’t much smarter – it returns a list of circles wrapped in a grouping element, like this:
// src/components/Particles/index.jsx
import React, { PropTypes } from 'react';

import Particle from './Particle';

const Particles = ({ particles }) => (
    <g>{particles.map(particle =>
        <particle key={particle.id} {...particle}="">
        )}
    </particle></g>
);

Particles.propTypes = {
    particles: PropTypes.arrayOf(PropTypes.shape({
        id: PropTypes.number.isRequired,
        x: PropTypes.number.isRequired,
        y: PropTypes.number.isRequired
    }).isRequired).isRequired
};

export default Particles;
Note that key={particle.id} part. React complains endlessly without it. I think it’s used to tell similar components apart, which makes the fancy algorithms work.
Cool. Given an array of {id, x, y} objects, we can render our SVG circles. Now comes our first fun component: the App.
App takes care of rendering the scene and attaching d3 event listeners. The rendering part looks like this:
// src/components/index.jsx

import React, { PropTypes, Component } from 'react';
import ReactDOM from 'react-dom';
import d3 from 'd3';

import Particles from './Particles';
import Footer from './Footer';
import Header from './Header';

class App extends Component {
    render() {
        return (
            <div onmousedown="{e" ==""> this.props.startTicker()} style={{overflow: 'hidden'}}>
                 <header>
                 <svg width={this.props.svgWidth} height={this.props.svgHeight} ref="svg" style="{{background:" 'rgba(124,="" 224,="" 249,="" .3)'}}="">
                     <particles particles={this.props.particles}></particles>
                 </svg>
                 <footer n={this.props.particles.length}>
             </footer></header></div>
        );
    }
}

App.propTypes = {
    svgWidth: PropTypes.number.isRequired,
    svgHeight: PropTypes.number.isRequired,
    startTicker: PropTypes.func.isRequired,
    startParticles: PropTypes.func.isRequired,
    stopParticles: PropTypes.func.isRequired,
    updateMousePos: PropTypes.func.isRequired
};

export default App;
There’s more going on, but the gist is that we return a <div> with a Header, a Footer, and an <svg>. Inside <svg>, we use Particles to render many circles. Don’t worry about the Header and Footer; they’re text.
Notice that the core of our rendering function only says “Put all Particles here, please”. There’s nothing about what’s moved, what’s new, or what’s no longer needed. We don’t have to worry about that.
We get a list of coordinates and naively render circles. React takes care of the rest. If you ask me, that’s the real magic here.
Oh, and we call startTicker() when a user clicks on our scene. No reason to have the clock running before any particles exist.
D3 event listeners
To let users generate particles, we have to wire up those functions we mentioned in propTypes. It looks like this:
// src/components/index.jsx

class App extends Component {
    componentDidMount() {
        let svg = d3.select(this.refs.svg);

        svg.on('mousedown', () => {
            this.updateMousePos();
            this.props.startParticles();
        });
        svg.on('touchstart', () => {
            this.updateTouchPos();
            this.props.startParticles();
        });
        svg.on('mousemove', () => {
            this.updateMousePos();
        });
        svg.on('touchmove', () => {
            this.updateTouchPos();
        });
        svg.on('mouseup', () => {
            this.props.stopParticles();
        });
        svg.on('touchend', () => {
            this.props.stopParticles();
        });
        svg.on('mouseleave', () => {
            this.props.stopParticles();
        });

    }

    updateMousePos() {
        let [x, y] = d3.mouse(this.refs.svg);
        this.props.updateMousePos(x, y);
    }

    updateTouchPos() {
        let [x, y] = d3.touches(this.refs.svg)[0];
        this.props.updateMousePos(x, y);
    }
There are some events to think about:
mousedownandtouchstartturn on particle generationmousemoveandtouchmoveupdate the mouse locationmouseup,touchend, andmouseleaveturn off particle generation
Then you have updateMousePos and updateTouchPos, which use d3’s magic to calculate new (x, y) coordinates relative to our SVG element. The particle generation step uses this data as each particle’s initial position.
Yes, it’s complicated.
Remember, React isn’t smart enough to figure out mouse position relative to our drawing area. React knows that we clicked a DOM node. D3 does the magic to find exact coordinates.
For touch events, we only consider the first touch’s position. We could let users shoot particles out of multiple fingers at once, but there’s enough going on as it is.
That’s it for the rendering and the user events. 107 lines of code.
6 Actions
Redux actions are a fancy way of saying “Yo, a thing happened!”. They’re functions you call to get structured metadata about what’s up.
We have 6 actions. The most complicated one looks like this:
// src/actions/index.jsx
export const CREATE_PARTICLES = "CREATE_PARTICLES";

export function createParticles(N, x, y) {
  return {
    type: CREATE_PARTICLES,
    x: x,
    y: y,
    N: N,
  };
}
It tells the system to create N particles at (x, y) coordinates. You’ll see how that works when we look at the Reducer, and you’ll see how it triggers when we look at the Container.
Actions must have a type. Reducers use the type to decide what to do.
Our other actions are tickTime, tickerStarted, startParticles, stopParticles, and updateMousePos. You can guess what they mean :)
1 Container component
Containers are React components much like the presentation bits. Unlike presentation components, containers talk to the redux data store.
I’m not sure this separation is strictly necessary, but it does make your code look nice. You have functionally clean presentation components that turn properties into elements, and dirty, dirty containers that talk to the outside world.
You can think of them as data store monads if it helps.
The gist of our AppContainer looks like this:
// src/containers/AppContainer.jsx
import { connect } from 'react-redux';
import React, { Component } from 'react';

import App from '../components';
import { tickTime, tickerStarted, startParticles, stopParticles, updateMousePos, createParticles } from '../actions';

class AppContainer extends Component {
    componentDidMount() {
        const { store } = this.context;
        this.unsubscribe = store.subscribe(() =>
            this.forceUpdate()
        );
    }

    componentWillUnmount() {
        this.unsubscribe();
    }

   // ...

    render() {
        const { store } = this.context;
        const state = store.getState();

        return (
            <app {...state}="" startticker={::this.startTicker} startparticles={::this.startParticles} stopparticles={::this.stopParticles} updatemousepos={::this.updateMousePos}>
        );
    }
};

AppContainer.contextTypes = {
    store: React.PropTypes.object
};

export default AppContainer;
</app>
We import stuff, then we define AppContainer as a proper React Component. We need to use lifecycle methods, which aren’t available in stateless components.
There are three important parts in this code:
- We wire up the store in
componentDidMountandcomponentWillUnmount. Subscribe to data changes on mount, unsubscribe on unmount. - When rendering, we assume the store is our context, use
getState(), then render the component we’re wrapping. In this case, we render theAppcomponent. - To get the store as our context, we have to define
contextTypes. It won’t work otherwise. This is deep React magic.
Contexts are nice because they let us implicitly pass properties. The context can be anything, but Redux prefers it be the store. That contains everything about application state – both UI and business data.
That’s where the monad comparison comes from … my foray into Haskell may have broken me. I see monads everywhere.
In case you were wondering, that {::this.startTicker} syntax comes from ES2016. It’s equivalent to {this.startTicker.bind(this)}. Enable stage-0 in your Babel config to use it.
AppContainer talks to the store
Great, you know the basics. Now we need to define those callbacks so App can trigger actions. Most are boilerplate-y action wrappers. Like this:
// src/containers/AppContainer.jsx
    startParticles() {
        const { store } = this.context;
        store.dispatch(startParticles());
    }

    stopParticles() {
        const { store } = this.context;
        store.dispatch(stopParticles());
    }

    updateMousePos(x, y) {
        const { store } = this.context;
        store.dispatch(updateMousePos(x, y));
    }
That’s boilerplate. The action function gives us that {type: ..} object, and we dispatch it on the store.
When that happens, Redux uses our reducer to create a new instance of the state tree. We’ll talk more about that in the next section.
First, we have to look at the startTicker callback. It’s where our magic begins.
    startTicker() {
        const { store } = this.context;

        let ticker = () => {
            if (store.getState().tickerStarted) {
                this.maybeCreateParticles();
                store.dispatch(tickTime());

                window.requestAnimationFrame(ticker);
            }
        };

        if (!store.getState().tickerStarted) {
            console.log("Starting ticker");
            store.dispatch(tickerStarted());
            ticker();
        }
    }
Oof. Don’t worry if you don’t “get” this immediately. It took me a few hours to create.
This drives our animation loop. Some might call it the game loop.
It dispatches the tickTime action on every requestAnimationFrame. Every time the browser is ready to render, we get a chance to update our Redux data store. In theory, that’s 60 times a second, but it depends on many factors. Look it up.
startTicker updates the store in two steps:
- Check
tickerStartedflag and only start the ticker if it hasn’t been started yet. This way we don’t try to run multiple animation frames per render frame. As a result, we can be naive about bindingstartTickertoonMouseDown. - Create a
tickerfunction that generates particles, dispatches thetickTimeaction, and recursively calls itself on everyrequestAnimationFrame. We check thetickerStartedflag every time so we can potentially stop time.
Yes, that means we are asynchronously dispatching redux actions. It’s okay; that sort of Just Working (tm) is one of the main benefits of immutable data.
The maybeCreateParticles function itself isn’t too interesting. It gets (x, y) coordinates from store.mousePos, checks the generateParticles flag, and dispatches the createParticles action.
That’s the container. 83 lines of code.
1 Reducer
Sweet. With the actions firing and the drawing done, it’s time to look at the entire logic of our particle generator. We’ll get it done in just 33 lines of code and some change.
Ok. Honestly? It’s a bunch of change. But the 33 lines that make up CREATE_PARTICLES and TIME_TICK changes are the most interesting.
All of our logic goes in the reducer. Dan Abramov says to think of reducers as the function you’d put in .reduce(). Given a state and a set of changes, how do I create the new state?
A simplistic example would look like this:
let sum = [1, 2, 3, 4].reduce((sum, i) => sum + i, 0);
For every number, take the previous sum and add the number.
Our particle generator is a more complicated version of that. It takes the current application state, incorporates an action, and returns the new application state. To keep things simple, we’ll put everything into the same reducer and use a big switch statement to decide what to do based on action.type.
In bigger applications, we’d split this into multiple reducers, but the base principles stay the same.
Let’s start with the basics:
// src/reducers/index.js
const Gravity = 0.5,
  randNormal = d3.random.normal(0.3, 2),
  randNormal2 = d3.random.normal(0.5, 1.8);

const initialState = {
  particles: [],
  particleIndex: 0,
  particlesPerTick: 5,
  svgWidth: 800,
  svgHeight: 600,
  tickerStarted: false,
  generateParticles: false,
  mousePos: [null, null],
};

function particlesApp(state = initialState, action) {
  switch (action.type) {
    default:
      return state;
  }
}

export default particlesApp;
This is our reducer.
We started with the gravity constant and two random generators. Then we defined the default state:
- an empty list of particles
- a particle index, which I’ll explain in a bit
- the number of particles we want to generate on each tick
- default svg sizing
- and the two flags and
mousePosfor the generator
Our reducer doesn’t change anything yet. It’s important to always return at least an unchanged state.
Update the state to animate
For most actions, our reducer updates a single value. Like this:
// src/reducers/index.js
    switch (action.type) {
        case 'TICKER_STARTED':
            return Object.assign({}, state, {
                tickerStarted: true
            });
        case 'START_PARTICLES':
            return Object.assign({}, state, {
                generateParticles: true
            });
        case 'STOP_PARTICLES':
            return Object.assign({}, state, {
                generateParticles: false
            });
        case 'UPDATE_MOUSE_POS':
            return Object.assign({}, state, {
                mousePos: [action.x, action.y]
            });
Even though we’re only changing values of boolean flags and two-digit arrays, we have to create a new state. Always create a new state. Redux relies on application state being immutable.
That’s why we use Object.assign({}, ... every time. It creates a new empty object, fills it with the current state, then overwrites specific values with new ones.
Either do that every time, or use a library for immutable data structures. That might work better, but I haven’t tried it yet.
The two most important state updates – animation tick and create particles – look like this:
        case 'CREATE_PARTICLES':
            let newParticles = state.particles.slice(0),
                i;

            for (i = 0; i < action.N; i++) {
                let particle = {id: state.particleIndex+i,
                                x: action.x,
                                y: action.y};

                particle.vector = [particle.id%2 ? -randNormal() : randNormal(),
                                   -randNormal2()*3.3];

                newParticles.unshift(particle);
            }

            return Object.assign({}, state, {
                particles: newParticles,
                particleIndex: state.particleIndex+i+1
            });
        case 'TIME_TICK':
            let {svgWidth, svgHeight} = state,
                movedParticles = state.particles
                                      .filter((p) =>
                                          !(p.y > svgHeight || p.x < 0 || p.x > svgWidth))
                                      .map((p) => {
                                          let [vx, vy] = p.vector;
                                          p.x += vx;
                                          p.y += vy;
                                          p.vector[1] += Gravity;
                                          return p;
                                      });

            return Object.assign({}, state, {
                particles: movedParticles
            });
That looks like a bunch of code. Sort of. It’s spread out.
The first part – CREATE_PARTICLES – copies all current articles into a new array and adds action.N new particles to the beginning. In my tests, this proved smoother than adding particles at the end. Each particle starts life at (action.x, action.y) and gets a random movement vector.
This is bad from Redux’s perspective. Reducers are supposed to be pure functions, and randomness is inherently impure. I think it’s fine in this case.
The other possible approach would shove this logic into the action. That has benefits, but makes it harder to see all logic in one place. Anyway …
The second part – TIME_TICK – doesn’t copy the particles (although maybe it should). Arrays are passed by reference, so we’re mutating existing data either way. This is bad, but it’s not too bad. It definitely works faster :)
We filter out any particles that have left the visible area. For the rest, we add the movement vector to their position. Then we change the y part of the vector using our Gravity constant.
That’s an easy way to implement acceleration.
That’s it. Our reducer is done. Our particle generator works. Our thing animates smoothly. \o/
Important Discoveries
Building this particle generator in React and Redux, I made three important discoveries:
- Redux is much faster than I thought. You’d think creating a new copy of the state tree on each animation loop was crazy, but it works well. We’re probably creating only a shallow copy for the most part, which explains the speed.
- Adding to JavaScript arrays is slow. Once we hit about 300 particles, adding new ones becomes visibly slow. Stop adding particles and you get smooth animation. This indicates that something about creating particles is slow: either adding to the array, or creating React component instances, or creating SVG DOM nodes.
- SVG is also slow. To test the above hypothesis, I made the generator create 3000 particles on first click. The animation speed is terrible at first and becomes okayish at around 1000 particles. This suggests that shallow copying big arrays and moving existing SVG nodes around is faster than adding new stuff. Here’s a gif:
Fin
There you go. Animations done with React, Redux, and d3. New superpower? Maybe.
Here’s the recap:
- React handles rendering
- d3 calculates stuff
- Redux handles state
- element coordinates are state
- change coordinates on every
requestAnimationFrame - magic
Don’t forget: this and other cool stuff will show up in the new version of my book, React+d3, that’s launching this month.
:)
Thanks to Primoz Cigler, Sigurt Bladt Dinesen, and Will Fanguy for reading drafts of this article
Continue reading about Animating with React, Redux, and d3
Semantically similar articles hand-picked by GPT-4
- Livecoding #12: towards animating 10k+ elements with React
- A Dancing Rainbow Snake – An Example of Minimal React and D3v4 transitions
- Livecoding #13: rendering React components with canvas
- Livecoding #14: Mostly-smooth animation up to 4,000 elements with React and canvas
- Livecoding #15: Reaching the limits of canvas redraw speed
Learned something new?
Read more Software Engineering Lessons from Production
I write articles with real insight into the career and skills of a modern software engineer. "Raw and honest from the heart!" as one reader described them. Fueled by lessons learned over 20 years of building production code for side-projects, small businesses, and hyper growth startups. Both successful and not.
Subscribe below 👇
Software Engineering Lessons from Production
Join Swizec's Newsletter and get insightful emails 💌 on mindsets, tactics, and technical skills for your career. Real lessons from building production software. No bullshit.
"Man, love your simple writing! Yours is the only newsletter I open and only blog that I give a fuck to read & scroll till the end. And wow always take away lessons with me. Inspiring! And very relatable. 👌"

Have a burning question that you think I can answer? Hit me up on twitter and I'll do my best.
Who am I and who do I help? I'm Swizec Teller and I turn coders into engineers with "Raw and honest from the heart!" writing. No bullshit. Real insights into the career and skills of a modern software engineer.
Want to become a true senior engineer? Take ownership, have autonomy, and be a force multiplier on your team. The Senior Engineer Mindset ebook can help 👉 swizec.com/senior-mindset. These are the shifts in mindset that unlocked my career.
Curious about Serverless and the modern backend? Check out Serverless Handbook, for frontend engineers 👉 ServerlessHandbook.dev
Want to Stop copy pasting D3 examples and create data visualizations of your own? Learn how to build scalable dataviz React components your whole team can understand with React for Data Visualization
Want to get my best emails on JavaScript, React, Serverless, Fullstack Web, or Indie Hacking? Check out swizec.com/collections
Did someone amazing share this letter with you? Wonderful! You can sign up for my weekly letters for software engineers on their path to greatness, here: swizec.com/blog
Want to brush up on your modern JavaScript syntax? Check out my interactive cheatsheet: es6cheatsheet.com
By the way, just in case no one has told you it yet today: I love and appreciate you for who you are ❤️